
How to Extract Drum Hits From Audio in Beat Studio
Use Extract mode in the Beat Studio pattern editor to detect kick, snare, hi-hat and crash hits from a song's drum stem and turn them into a playable pattern.
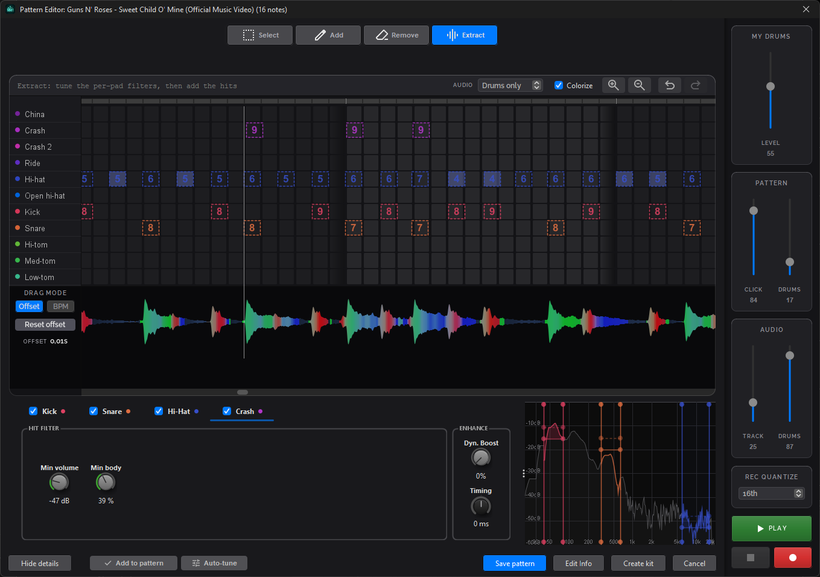
Found a song you want to practise, but there’s no MIDI or Guitar Pro file for it? You can still get the drum pattern. Extract mode in the pattern editor listens to the song’s drum stem, finds the kick, snare, hi-hat and crash hits, and puts them on the grid for you.
Before you start
You need a pattern with an imported audio recording. Audio and URL import are PRO features. Create one from the library with New pattern, and choose to start from an audio recording. Beat Studio separates the drum stem during import, and that’s what Extract listens to.
If you do have a MIDI or Guitar Pro file, use the wizard’s audio + file option instead. It matches the file to the recording and is usually more accurate. There’s more on that route in the drum kit tutorial.
The short version
Many of us aren’t great at sitting still, so if you’d rather be hitting things than reading, here’s everything that matters in under a minute:
- Open Extract and check Auto-tune’s first pass. If it looks right, click Add to pattern. Usually it needs some fine-tuning.
- Start with kick and snare. Hover over hits to see where each drum jumps on the frequency graph, then set narrow ranges that don’t overlap: each range should jump on its own drum and stay quiet on the other.
- Use the hit filter to clean up. Min volume, Min Attack and Min duration decide which sounds count as hits.
- Expect the hi-hat to take the most work. Clean separation is rarely possible, so let Fill gaps, Hat rate and Sync build a steady hi-hat line.
- Crashes have no frequency range. They’re found from their long, bright decay, and Min body sets how much is needed.
- Listen and line things up. Play the stem with the hits and fix drums that drift with Timing. Kicks often land late.
- Add to pattern, then fix by hand. It only adds hits. Ride, toms, open hi-hat and China go in manually.
If you want to know more, carry on reading. The steps below go through each part in detail, with screenshots.
Step 1: Open Extract mode
Open the pattern in the pattern editor and click Extract in the toolbar at the top, next to Select, Add and Remove. Opening it takes a little while, because Extract analyses the audio first. The hint above the grid sums up the whole workflow: tune the per-pad filters, then add the hits.
Auto-tune does a first pass for you. The first time you open Extract on a pattern, Auto-tune sets all the Extract settings automatically. After that, Extract remembers your settings and loads them the next time you open it.
Depending on the song, the result can be good or not so good. If you’re happy with it, you can click Add to pattern right away and jump to Step 8. Often, though, a good result needs some manual fine-tuning, and that’s what the steps below are for.
If the song’s tempo drifts. When a song’s tempo changes or drifts, Extract can offer a tempo map that follows the recording. The offer can appear when the drum track is analysed, after the hits are detected, or the first time you click Add to pattern. Accept it to make the grid bend with the song, so the hits line up with the beats. Extract never adds a tempo map without asking.
Step 2: Set up the view
Two settings in the toolbar above the grid make the rest much easier:
- Audio: Drums only or Overlaid. Drums only shows just the drum stem, without the rest of the band. Overlaid shows the drum stem and the full song on top of each other, so you can see the drums in the context of the music.
- Colorize. Colours the waveform by frequency, so you can tell the drums apart by eye: kicks show red or purple, snares green or cyan, and cymbal wash blue.
With Colorize on, you can check every detected hit against the waveform below it. A kick marked on a green spike, for example, is probably a snare.
Start with kick and snare. It’s usually easier to get the kick and snare right first, so untick the Hi-Hat and Crash tabs below the grid and leave only Kick and Snare ticked. That way the other drums don’t clutter the grid while you work.
Step 3: The basics - Kick and Snare
Each drum listens to its own frequency range, shown as a coloured band on the frequency graph to the right of the tabs. Getting these ranges right matters more than any other setting, so start with the two drums that carry the groove: kick and snare.
The goal is not to find each drum’s highest peak. It’s to find a range that jumps when that drum is played and stays quiet when the other one is. That’s how Extract tells the kick and snare apart.
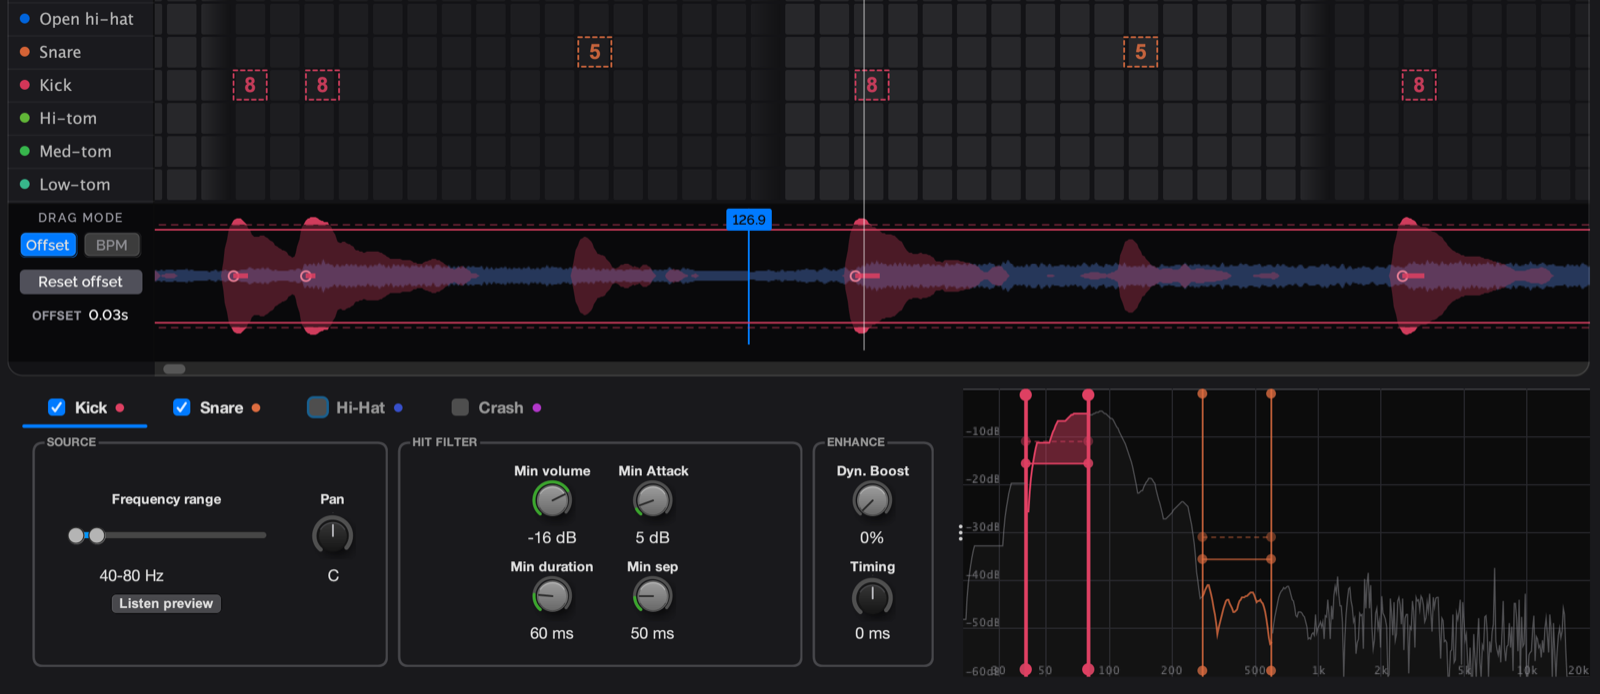
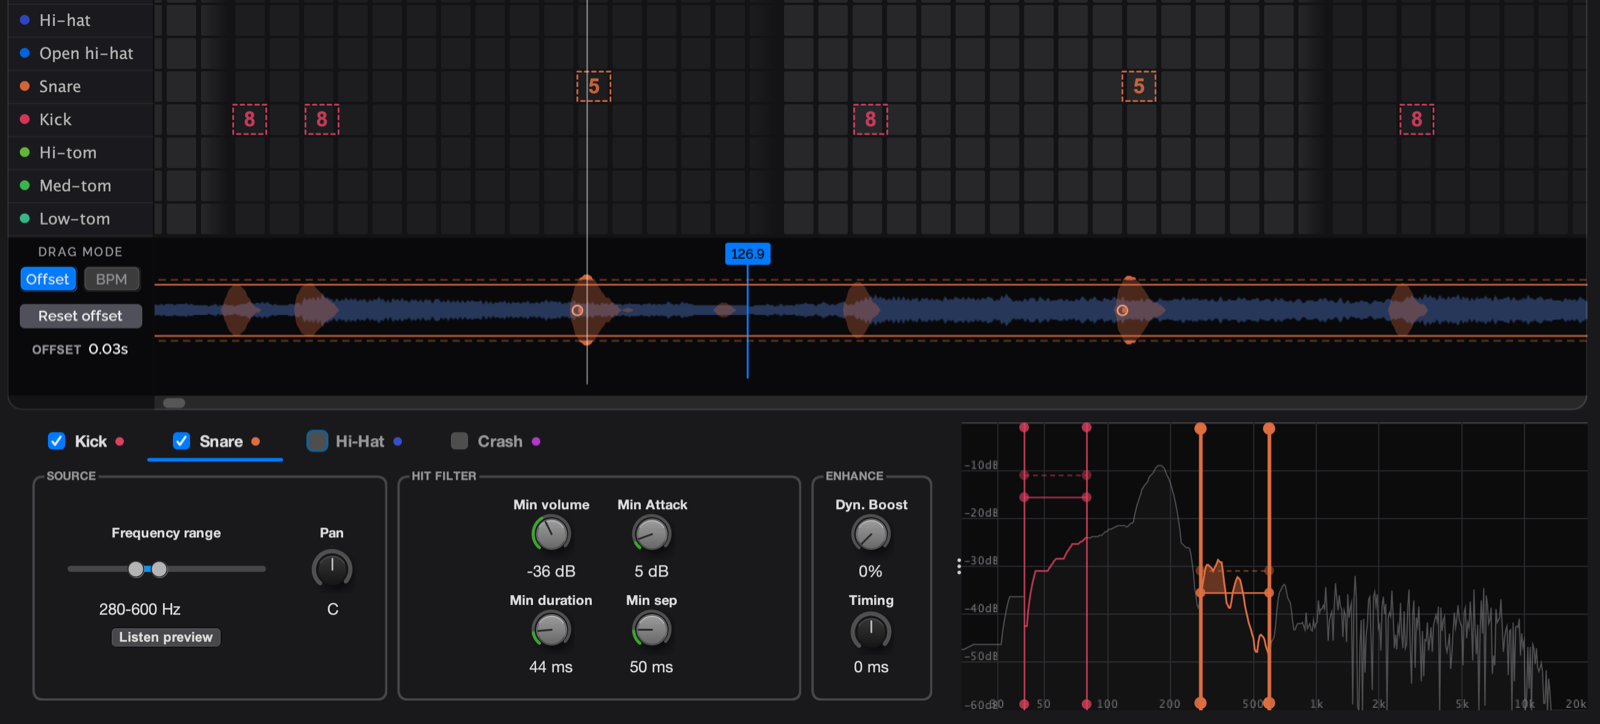
- Compare kick and snare hits. Hover the mouse over a kick hit on the audio wave and watch the frequency graph move. Then hover over a snare hit and compare. A kick usually jumps on the left side of the graph, in the low frequencies. A snare usually jumps in the middle, in the mid frequencies.
- Set the kick range. Select the Kick tab and move its range to a spot on the left where the graph jumps on kick hits but stays low on snare hits. Use the slider bar or drag the handles on the graph.
- Set the snare range. Select the Snare tab and move its range to a spot near the centre of the graph that jumps on snare hits but doesn’t rise much when the kick is played.
- Check both ways. Hover over a few more hits of each drum. The kick range should only jump on kicks, and the snare range only on snares.
Here’s what that looks like. Hovering over a kick hit, the graph jumps high inside the narrow kick range on the left (40–80 Hz), while the snare range in the middle stays low:
Now hover over a snare hit. The snare range (280–600 Hz) stayed low on the kick hit above, but on a snare hit it jumps:
Two rules make the difference:
- Don’t let the kick and snare ranges overlap. If they do, both pads listen to the same frequencies and get triggered on the same hits.
- Keep the ranges narrow. A range doesn’t have to cover the whole area where a hit jumps. It only tells the pad which point of the spectrum to listen to. A narrow range in the right spot separates the drums more reliably than a wide one.
If you get lost, click Auto-tune at the bottom of the editor. It sets all the settings again automatically, so you can start over from a clean slate.
Step 4: Tune hit filter for kick and snare
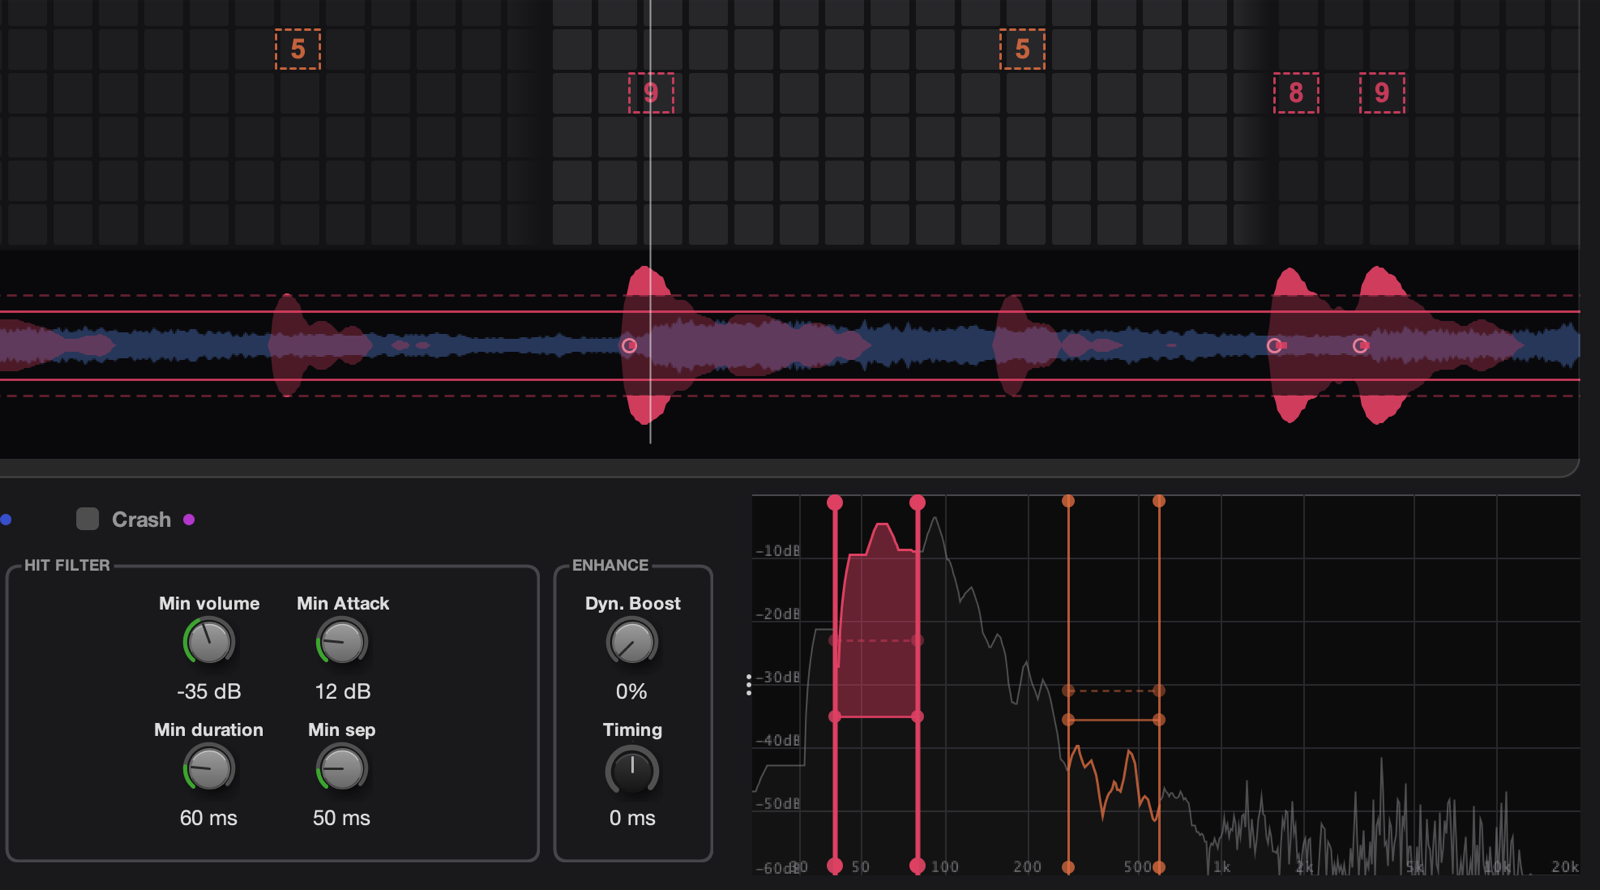
Once the ranges are set, the hit filter fine-tunes which hits count. Select the Kick or Snare tab and adjust its knobs while you watch the candidate hits on the grid.
Hit filter:
- Min volume sets how loud a sound must be to count as a hit. It’s measured against the loudest moment in the song. Turn it up to ignore quiet bleed from other drums and background noise. Turn it down if soft hits go missing.
- Min Attack sets how sharply the sound must jump to count as a new hit. That way separate hits are found even while a cymbal or open hi-hat is still ringing. Turn it up if hits are doubled, or a ringing sound is counted more than once. Turn it down if quick hits merge into one, or soft hits disappear.
- Min duration sets how long a sound must last to count as a hit. Turn it up to ignore short clicks and noise spikes. Turn it down if short, sharp hits or fast fills go missing. Set it to 0 to turn it off.
Both have to pass. A hit must be loud enough for Min volume and jump sharply enough for Min Attack. If soft hits are missing, try lowering Min Attack first.
Step 5: Hi-hat
Once the kick and snare look right, tick the Hi-Hat tab and set it up in the same order: first the frequency range, then the hit filter. Then use the hi-hat settings to fill in what the filter misses.
-
Find the hi-hat range. Hover over a few hi-hat hits on the audio wave. The hi-hat sits in the high frequencies, so it jumps on the right side of the graph.
-
Set the range. Select the Hi-Hat tab and move its range to the right side of the graph, where the hi-hat jumps. Keep it narrow, and don’t let it overlap the kick or snare range. Pick the spot where hi-hat hits jump the most compared to the others.
Be prepared that the separation won’t be as clean as with the kick and snare: kick and snare hits also create peaks in the high end, so it’s often impossible to find a spot that stays quiet on them.
-
Tune the hit filter. Use the same knobs as in Step 4. On many songs they help less than with the kick and snare, because all the drums and cymbals create a constant wash in the high frequencies.
-
Use Fill gaps, Hat rate and Sync. Because the hit filter can only do so much, these three hi-hat settings are often what makes the hi-hat line usable:
- Fill gaps adds hi-hat hits the detector missed: very quiet hats, hats hidden under the kick or snare, and hats missing in an otherwise steady pattern. Higher values accept weaker evidence, and 100% fills every gap. Real hits are never removed.
- Hat rate tells the tool which note value the hi-hat plays, such as 1/8 or 1/16. Hits that don’t fit the rate are filtered out, and when two hits are closer than the rate, only the louder one is kept.
- Sync sets how hats line up in time. Off keeps them exactly where they were played. Snap aligns them with the song’s kick and snare. Force puts every hat on a steady grid at the Hat rate, which gives the cleanest result in busy mixes.
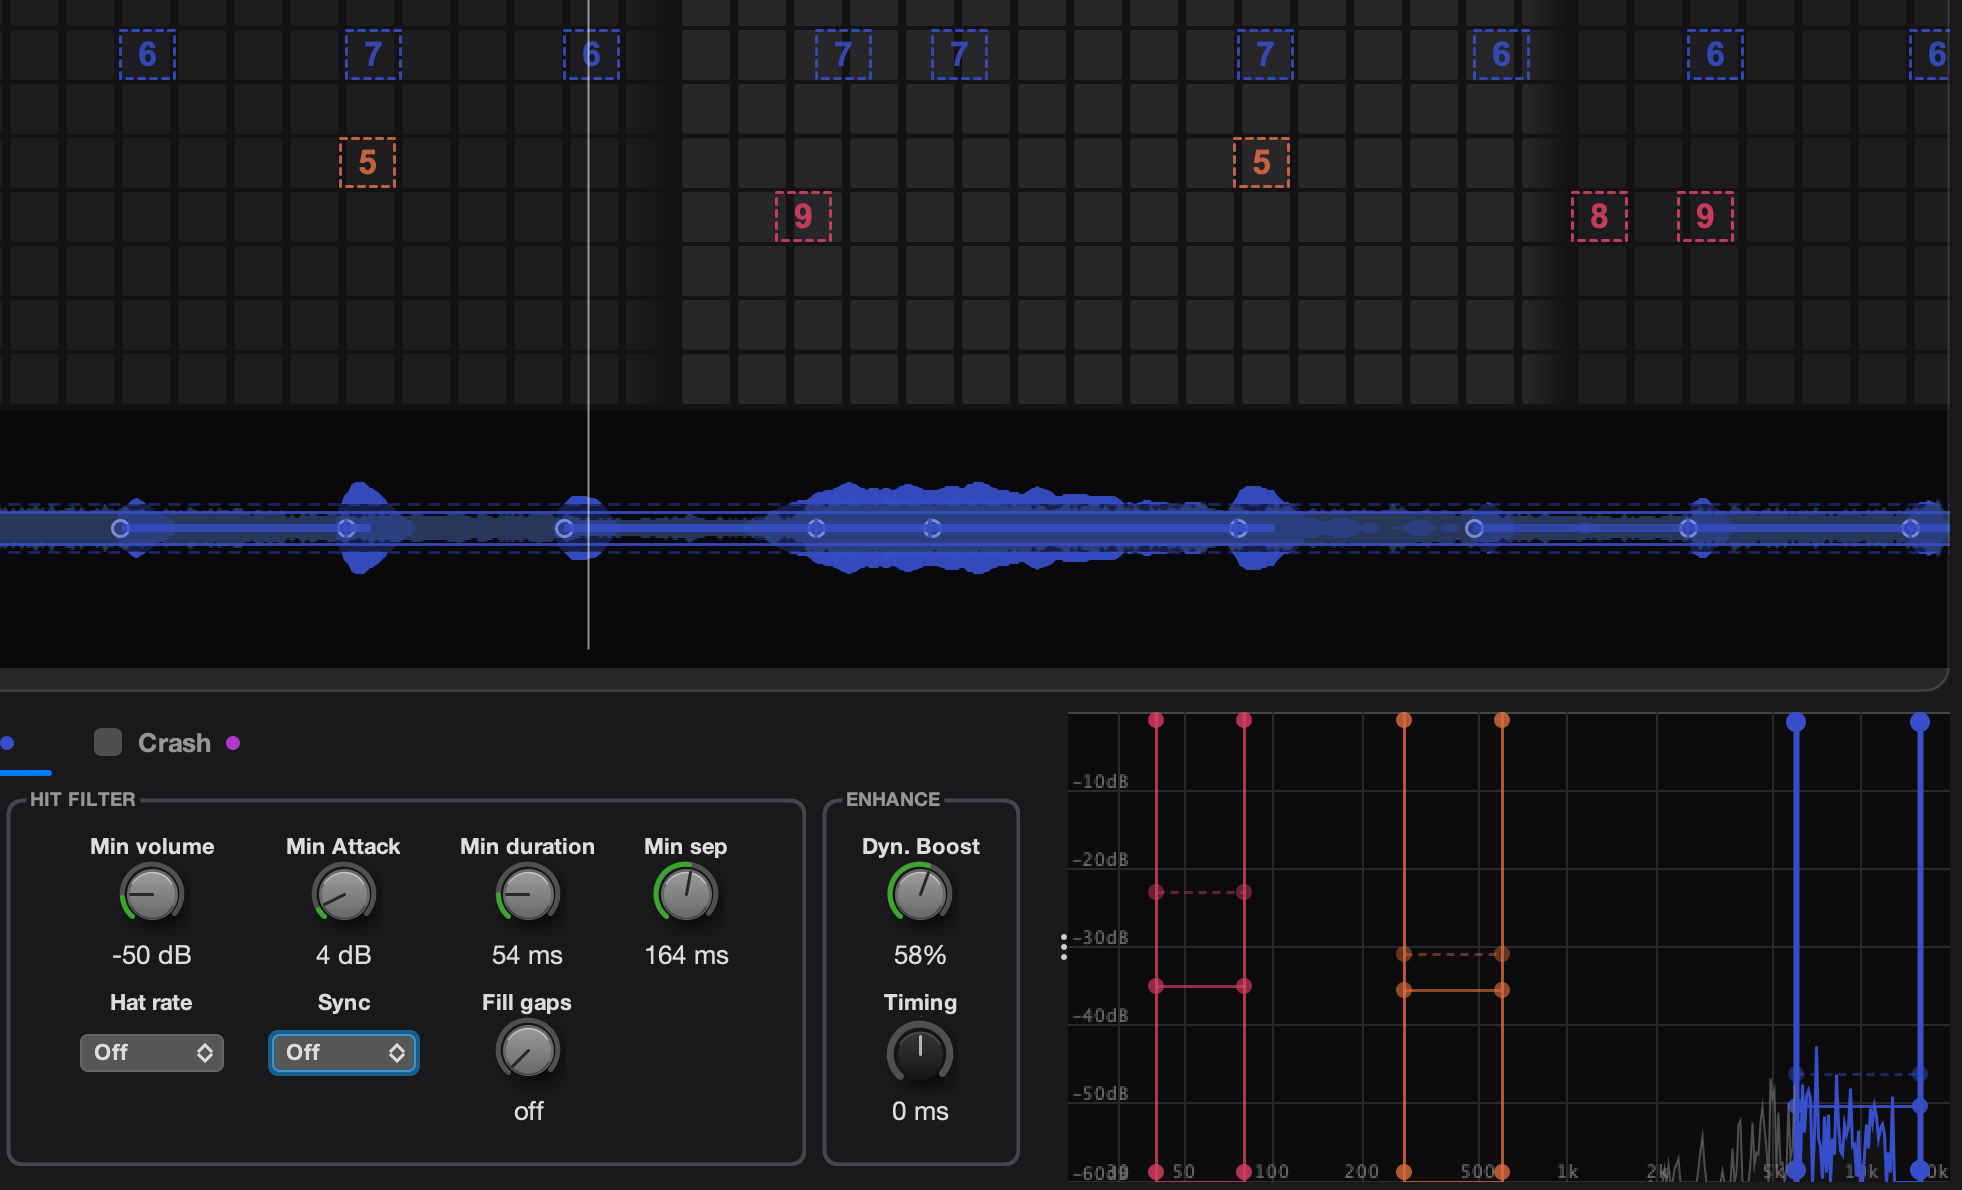
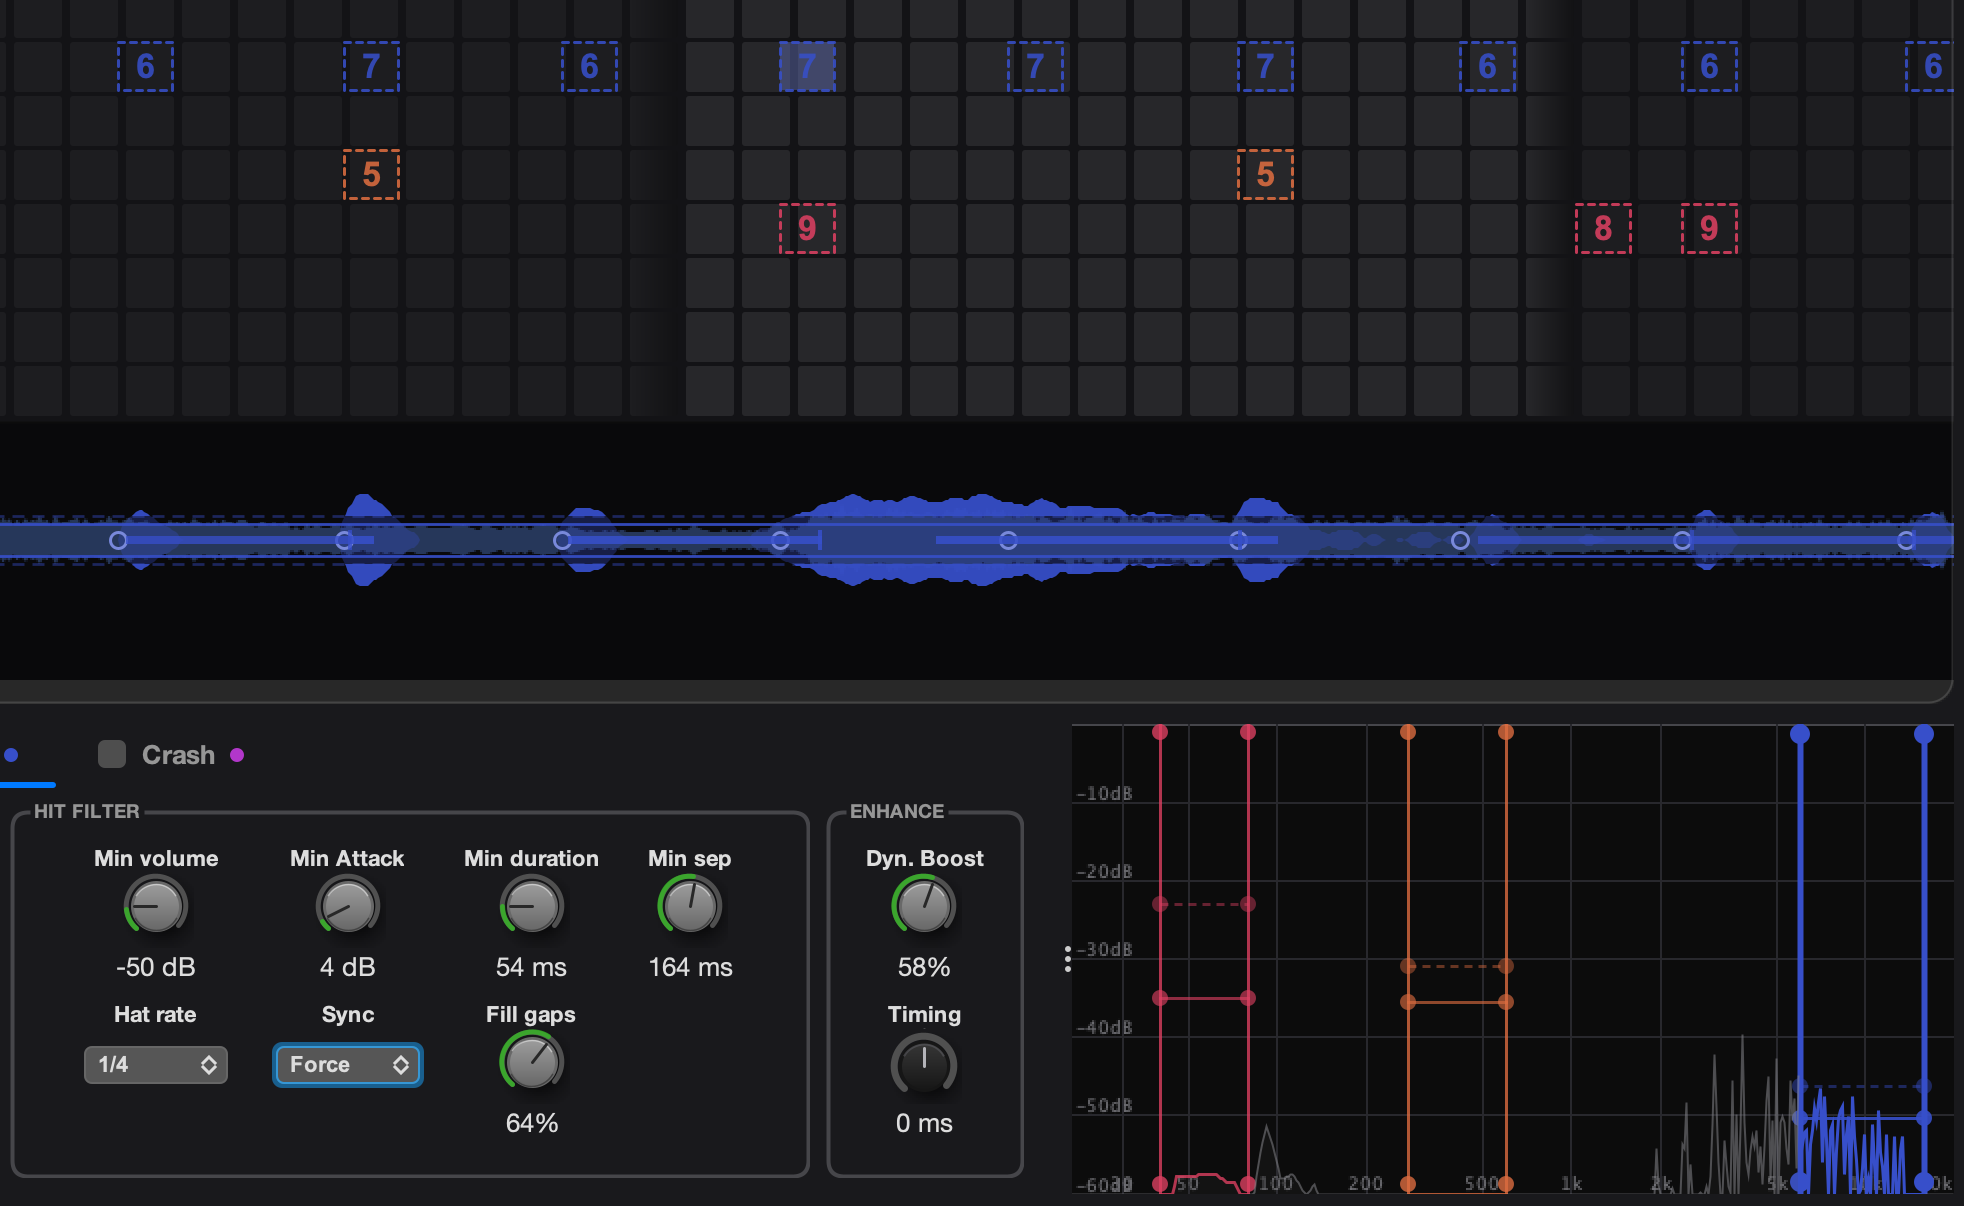
Hi-hat takes the most work. It’s the hardest pad to get right. Feel free to try different settings until the hi-hat line looks and sounds right.
Step 6: Crashes
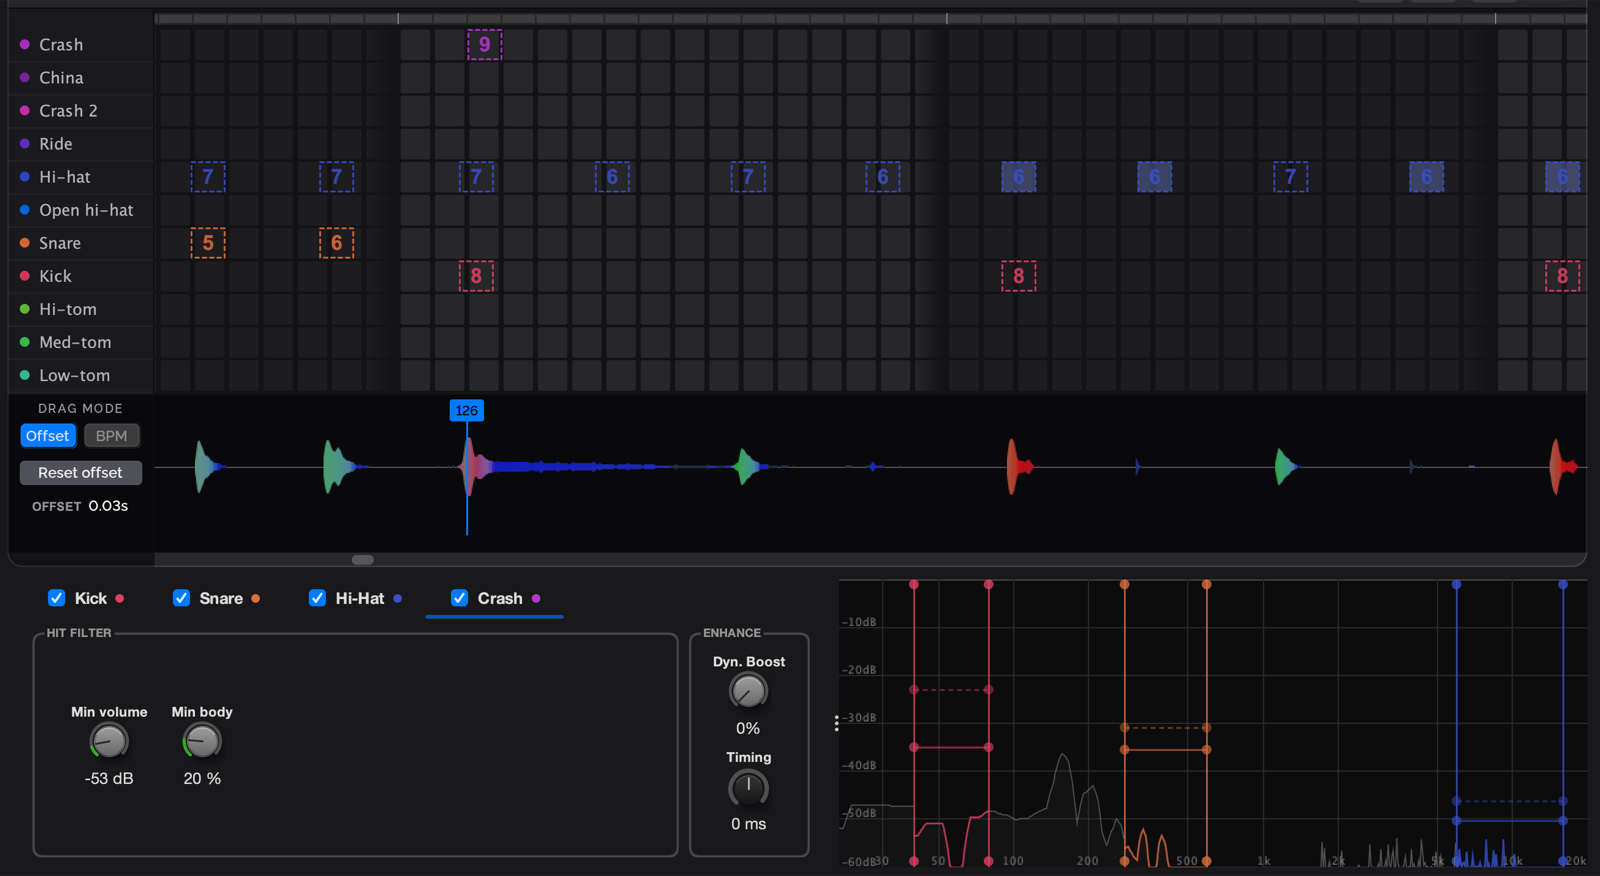
Last, tick the Crash tab. Crashes work differently from the other drums: they don’t have a frequency range. Instead, Extract spots them from their long high-frequency decay, which shows up on the colourised audio wave as a long blue tail after the hit.
The Crash tab has two hit filter knobs:
- Min volume works the same way as for the other drums.
- Min body sets how much ringing, bright sound a hit must leave behind to count as a crash. Raise it if short cymbal hits get picked up as crashes, and lower it if real crashes are missed.
Step 7: Fine-tune velocity and timing
Once the right hits are found, the Enhance knobs fine-tune how they’re played back: how hard each hit is and exactly when it lands. Each tab has its own Enhance knobs, so you can adjust each drum separately.
This is a good point to listen. Click Play in the pattern editor and listen to the separated drum stem together with the previewed pattern hits. That way you can hear if a drum plays out of sync with the real drums in the stem. If it does, use that drum’s Timing knob to fine-tune it.
- Timing shifts all hits on the pad earlier or later, by up to 50 ms. Turn it left (negative) to move hits earlier, or right (positive) to move them later. Double-click the knob to reset it to 0. Use it when a pad’s hits sit consistently behind or ahead of the audio.
- Dyn. Boost raises the velocity of the detected hits, and lifts soft hits more than loud ones. Use it when hits come out too quiet, which often happens on the hi-hat. Higher values make the hits louder and more even, and 100% puts every hit at full velocity, so keep it low if you want to keep accents and ghost notes.
Why hi-hat hits come out quiet. Each hit’s velocity comes from how loud it is in the pad’s frequency range, compared with the loudest moment in the song. A narrow, high range like the hi-hat is quiet compared with the whole mix, so its hits often get low velocities, such as 2–4 when the maximum is 9. Dyn. Boost lifts them back up.
Why kicks land late. Low frequencies react slowly, so a kick range at 40–80 Hz often registers 20–35 ms late, and the kicks sit slightly behind the beat. Turn the Kick tab’s Timing left until they sit on the grid or match the audio.
Step 8: Add the hits and fine-tune by hand
When the candidates look right, click Add to pattern. The detected hits become normal pattern hits. Add to pattern never removes anything: it only adds the detected hits, next to any hits already in the pattern.
Now switch to the normal editing tools in the toolbar and fix single hits by hand:
- Add places the hits Extract missed, and the drums it doesn’t detect. Extract detects kick, snare, hi-hat and crash; ride, toms, open hi-hat and China aren’t currently supported.
- Select lets you pick hits and move them, for example a hit that landed on the wrong drum lane or slightly off the beat.
- Remove deletes false hits, such as bleed or a snare picked up as a kick.
Play the pattern with the song and listen. If a hit looks right on the grid but sounds wrong, trust your ears.
Tip for songs played on the ride: extract the ride pattern as hi-hat first. After adding the hits to the pattern, use Select to select all the hits in the Hi-hat lane and move them to the Ride lane. That’s much faster than placing every ride hit by hand.
When it sounds right, click Save pattern.
Tips for better results
- Busy mixes are harder. Extract works best on songs with a clear, upfront drum sound. Dense, heavily processed mixes give more false hits.
- Check it with Colorize. Most mistakes are easy to spot when a hit’s colour doesn’t match its lane.
- Bonus: build a kit from the same song. A clean extracted pattern is also the starting point for turning the song’s drum stem into a playable kit. Every hit on the grid becomes a sample candidate.