
How to Import a MIDI or Guitar Pro Song Into Beat Studio
Import a MIDI or Guitar Pro file into Beat Studio on its own or with an audio file or URL, and sync the drum track to the original recording's real tempo.
The quickest way to practise a real song in Beat Studio is to start from a MIDI or Guitar Pro file. The drum track becomes your pattern, with every hit scored as you play. What you hear behind it depends on one choice: use the file alone, or pair it with the song’s original recording.
This tutorial covers both routes, step by step.
Which route should you pick?
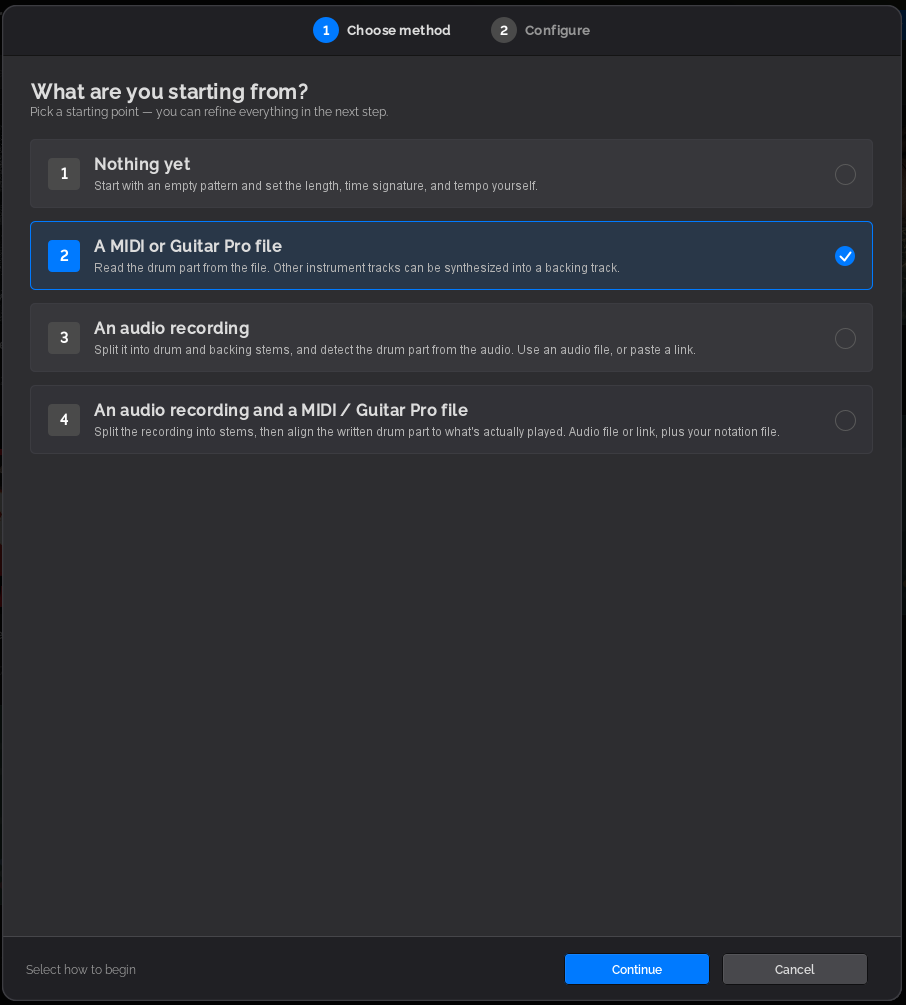
The New pattern wizard in the library asks what you’re starting from. Two of the four options use a MIDI or Guitar Pro file:
| File only | File + audio file or URL | |
|---|---|---|
| Wizard option | A MIDI or Guitar Pro file | An audio recording and a MIDI / Guitar Pro file |
| What you play along with | The file’s other instruments, synthesized as a backing track | The original recording, with the drums removed |
| Tempo | Whatever the file says | Follows the recording’s real tempo, drift and all |
| Setup time | Seconds | A minute or two, sometimes a little manual alignment |
| Best for | Quick practice, or songs where you have no recording | Sounding and feeling like the record |
There’s also a third route with no file at all: import just the audio and let Extract find the hits. That one has its own tutorial: How to Extract Drum Hits From Audio. If you have a file, it’s usually the more accurate starting point.
Before you start
- Song import is a PRO feature. FREE lets you build patterns from scratch.
- Supported files: MIDI (
.mid) and Guitar Pro (.gp,.gpx,.gp5). The file needs a drum track. - Where to find files: gprotab.net and midiworld.com are good free sources.
Check the file before you trust it. Many free MIDI and Guitar Pro files only cover part of the song, or have hits the drummer never played (and miss ones they did). Open the file in a tab viewer or skim it in the pattern editor after import. A file that tells a different story than the recording is the number one reason syncing needs manual work.
Route 1: Import a file with a synthesized backing track
Use this when you just want to get playing, or when there’s no recording to pair with the file.
- Open the wizard. In the library, click New pattern.
- Choose A MIDI or Guitar Pro file and click Continue.
- Pick your file. Beat Studio extracts the drum track as your pattern.
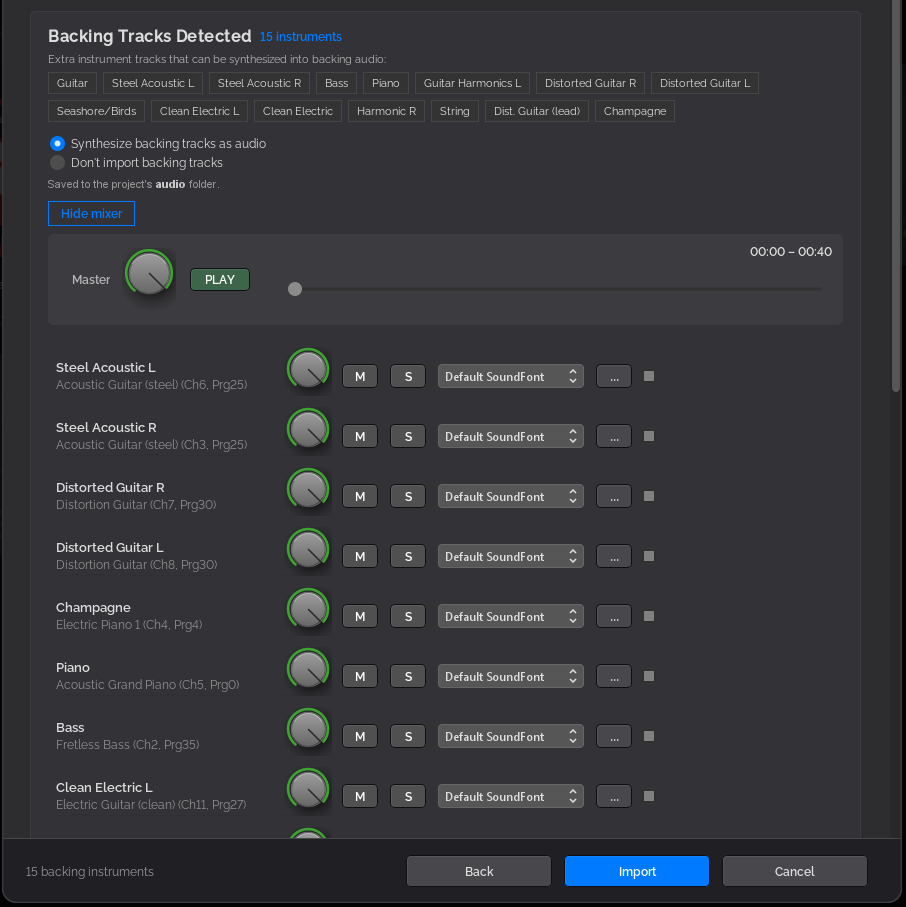
- Set up the backing track. Under Backing Tracks Detected, Beat Studio lists every other instrument track in the file — bass, guitars, keys and so on. Choose Synthesize backing tracks as audio to turn them into a backing track, or Don’t import backing tracks if you only want the drums. The synthesized audio is saved to the project’s audio folder.
- Mix it (optional). Click Show mixer to set each instrument’s level, mute (M) or solo (S) it, and pick a SoundFont per track. Use PLAY to preview the mix before you import.
- Click Import.
That’s it. Open the pattern and start training. The tempo comes straight from the file, so if the file has tempo changes, the pattern follows them.
Make the backing track sound better. The synthesized backing track uses General MIDI sounds by default. Pick a different SoundFont (.sf2) for a track in the mixer to change its sound and make the backing track sound much more like a band. polyphone.io has an editor and a library of 500 free SoundFonts.
Route 2: Import a file with the original recording
Use this when you want to play along with the actual record. Beat Studio separates the drum stem from the recording, so you hear the band without the original drummer, and you take their place.
Step 1: Choose the method
In the library, click New pattern, choose An audio recording and a MIDI / Guitar Pro file, and click Continue.
Step 2: Add the file and the audio
Pick your MIDI or Guitar Pro file, then add the recording. You have two options:
- An audio file from your computer.
- A URL to an audio or video stream. The first time you import from a URL, a consent dialog asks you to confirm you only download content you own or have permission to use.
Prefer the album version. Music videos and other online versions are often shorter edits of the released recording, with cut intros, missing choruses or extra footage. If the file was written from the album version, use the album audio too.
Step 3: Let the wizard sync it
Beat Studio now does the heavy lifting:
- It separates the drum stem from the recording.
- It analyses the song and detects the tempo.
- It matches the file’s drum hits to the drum stem and syncs the pattern to the recording.
When the audio is clear and the file matches the song, this is fully automatic and you can move straight on.
Step 4: Fix the alignment if needed
If the match is uncertain, the kick alignment view opens. It shows the waveform and the file’s kick hits on one timeline, so you can see exactly where they disagree.
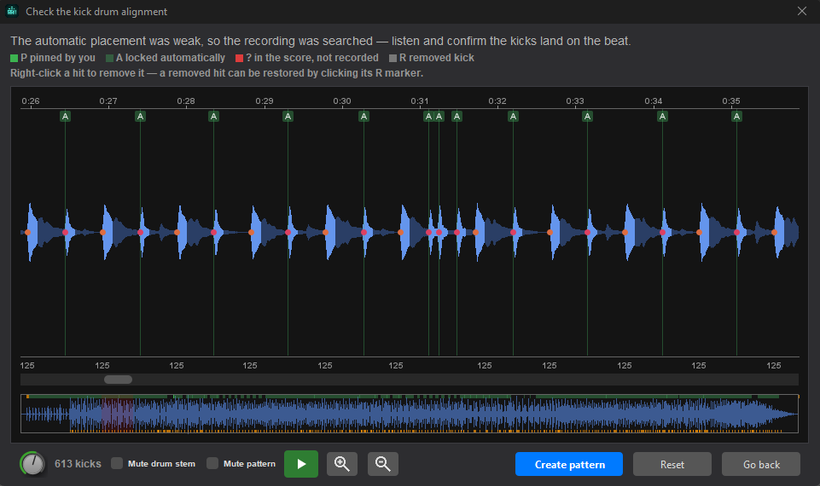
- Start with the first hit. Drag it onto the first kick in the waveform. Dragging a hit moves it and everything after it, so in many cases aligning just the first hit is enough. The view snaps the remaining hits into place for you.
- Pin what’s right. Once a hit sits correctly, pin it so later adjustments don’t move it.
- Work forward. If hits drift later in the song, find the first one that’s off, drag it into place, pin it, and carry on from there.
- Preview to hear the hits against the recording before you accept.
Turn on the colourised waveform to make kicks easier to spot: they show up red or purple, snares green or cyan.
Step 5: Check the result in the pattern editor
The alignment you make becomes the pattern’s variable tempo map. The recording always plays at its own natural tempo, and the grid bends to follow it, so the hits sit on the music even when the band speeds up or slows down.
Open the pattern in the pattern editor and press Play. Listen for sections where the drums drift away from the recording. You can fix them there:
- Adjust the tempo curve on the audio wave: hover and click Add to place a tempo point, then drag its line to change the tempo around it.
- Fix the file’s mistakes. Add, move or remove hits where the file doesn’t match what the drummer actually played.
When the import doesn’t go right
| Problem | Try this |
|---|---|
| Hits drift further off as the song goes on | Pin correct hits in the alignment view, or add tempo points in the pattern editor |
| A whole section is out of sync | The file or the audio is probably a different edit. Check for a missing chorus or intro, or try the album version |
| Hits where the drummer plays nothing | The file has extra parts. Delete them in the pattern editor |
| The pattern ends before the song does | The file only covers part of the song. Finish it by hand, or use Extract on the rest |
| The backing track generated from the MIDI or Guitar Pro file sounds thin or dated | Load a SoundFont |
| URL import fails | Check the link opens in a browser, then try downloading the audio and importing it as a file |
| No drum track found | The file has no drum part. Find another version, or import the audio alone and use Extract |
What’s next
Once the song is imported with its drum stem and the hits sit on the music, you’ve got everything you need to build a drum kit from the song’s drum stem, so your pads sound like the record too.
If you find a song that won’t sync, let me know on Patreon. The awkward ones are the best way for me to improve the import.