How to Edit a Drum Pattern in Beat Studio
Use the Beat Studio pattern editor to add, remove and move hits, set velocities, copy and paste sections, record from your kit and line the grid up with a song.
Whether you’re writing a groove from scratch, cleaning up an imported song or fixing the hits Extract got wrong, it all happens in the same place: the pattern editor. This tutorial walks through every part of it, from setting up the grid to saving the finished pattern.
Before you start
- To start a new pattern, click New pattern in the library and choose Nothing yet.
- To edit an existing pattern, open it in the pattern editor from the library.
- FREE covers the basics. Adding, removing and moving hits, choosing their velocity, copy and paste, and setting the BPM all work on FREE.
- PRO unlocks the rest. Undo and redo, Duplicate, Stretch, the All / After / Before selection buttons, Velocity − / +, the Hand tool, labels, recording, and the time signature, pickup, swing, Tap and Bar colors settings are PRO, as are audio import and Extract.
If your pattern comes from a song, the import and Extract tutorials cover getting the hits in. This one picks up from there:
The short version
- Set up the timing first. Time signature, note grid, pickup, swing and BPM live in the Timing panel under the grid.
- Add, Remove and Select are the three editing modes in the toolbar. In Select mode you can add and remove hits too, so you rarely need to switch.
- Each hit has a velocity from 1 to 9, shown as the number on the hit. Pick it in the Add tool’s Hit velocity row before you click, or change it afterwards.
- Drag to select, then Copy, Cut, Paste and Duplicate to reuse bars.
- Record from your kit if playing is faster than clicking. Rec quantize snaps what you play to the grid.
- Undo anything with the arrow buttons above the grid.
- Learn the keyboard shortcuts. They make every step below faster.
- Play it back, then Save pattern.
The editor at a glance
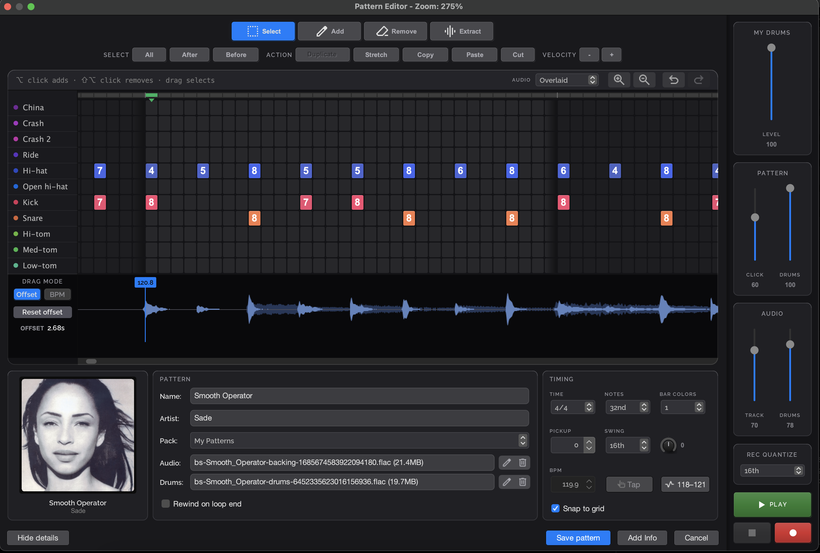
From top to bottom:
- Toolbar. The editing modes (Select, Add, Remove, Extract), and below them the options for the current mode.
- Grid. One lane per drum, from China at the top to Low-tom at the bottom. Each hit shows its velocity. Above the grid are the audio view selector, zoom, and undo and redo.
- Audio wave. Only shown when the pattern has audio. It shows the recording under the grid so you can line hits up with it.
- Details. Cover art, name, artist, pack and the audio files. Hide details collapses this area to give the grid more room.
- Timing. Time signature, note grid, pickup, swing and BPM.
- Mixer and transport. Levels for your drums, the pattern and the audio, plus Play, Stop and Record.
The hint line above the grid changes as you move the mouse and tells you what a click or drag will do at that spot. When in doubt, read it.
Step 1: Set up the timing
Do this before you place hits. Changing the time signature or grid later is possible, but it’s easier to start with the right grid.
- Time is the time signature, such as 4/4, 3/4 or 6/8.
- Notes sets the smallest note value on the grid, such as 16th or 32nd. Pick the shortest note the pattern needs. A finer grid gives you more places to put hits, but makes the grid busier.
- Bar colors divides each bar into coloured blocks, so it’s easier to see where the beats are when you place notes.
- Pickup adds notes before the first full bar, for songs that start with a lead-in.
- Swing sets which note value swings (such as 16th), and the knob next to it sets how much.
- BPM is the pattern’s tempo. Type it in, or click Tap and tap along. On a pattern with a tempo map, the button next to Tap shows the tempo range, such as 118–121. Click it to review the tempo map or remove it (see Step 7).
- Snap to grid keeps hits on the grid lines when you place or move them. Leave it on unless you need a hit slightly off the beat.
Pattern length. The bar above the grid has a handle at each end. Drag them to trim or extend the start and end of the pattern. Click the bar itself to set a start marker for playback, and click it again to clear it.
Step 2: Add and remove hits
Pick a mode in the toolbar:
- Add. Click a cell on the grid to place a hit on that drum.
- Remove. Click a hit to delete it.
- Select. Click or drag to select hits (see Step 4).
Stay in Select mode. Hold a modifier key and click to add or remove hits without leaving Select mode. The hint above the grid reminds you which keys, and they’re listed in Keyboard shortcuts.
Use the zoom buttons above the grid to zoom in for fast passages and out to see the whole song.
Step 3: Set the velocity
Every hit has a velocity from 1 (softest) to 9 (hardest), shown as the number on the hit. Velocity decides how loud the hit plays back. When you train, it’s also the target for your dynamics score, so accents and ghost notes are worth getting right.
There are three ways to set it:
- Before you add. In Add mode, the Hit velocity row under the toolbar has buttons from 1 to 9. New hits get the velocity you pick. The default is 5.
- Click to cycle. In Add mode, click an existing hit to cycle its velocity.
- Change a selection. Select one or more hits and click Velocity − or Velocity + in the toolbar to move them all down or up.
A quick way to write accents. Add the whole hi-hat line at a low velocity first. Then switch the Hit velocity to a high value and click the accented hits to raise them, or select them and use Velocity +.
Step 4: Select, copy and reuse
Most patterns repeat. Write a bar once, then reuse it.
Selecting hits:
- Click a hit to select it, or drag across the grid to select every hit inside the box.
- You can also add single hits to a selection, or select a range from the last hit you clicked. See Keyboard shortcuts.
- All selects every hit in the pattern.
- After and Before select every hit after or before the current selection. Select the first hit of a section and click After to grab everything from there to the end.
Working with a selection:
- Move selected hits by dragging them. Drag up or down to move them to another drum lane, or left and right to move them in time. You can also nudge them one grid step at a time from the keyboard.
- Copy, Cut and Paste. Paste puts the copied hits at the first selected cell, or at the start of the pattern if nothing is selected. To paste into bar 5, click the first cell of bar 5, then paste.
- Duplicate places a copy of the selection straight after it, with the exact same spacing. The pattern gets longer if it needs to, and the selection moves to the copy, so you can keep clicking Duplicate to repeat a bar again and again.
- Stretch spreads the selected hits out or squeezes them together, keeping their proportions, for example to turn a 16th-note figure into an 8th-note one. Select hits that cover at least two positions, click Stretch, and drag the handle at the end of the selection. The first hit stays put, and later hits on the same lanes shift along. The stretch is applied when you let go of the handle.
- Delete a selection with Cut, or from the keyboard.
Move a whole part to another drum. Patterns that should be played on the ride often come in on the hi-hat. Select every hit in the Hi-hat lane, then drag them to the Ride lane, or press the ↑ / ↓ arrow keys to move them one lane at a time. In the default lane order, Ride is right above Hi-hat, so a single press of ↑ does it.
Made a mistake? Use undo and redo, the arrow buttons at the top right of the grid.
Step 5: Add sticking and labels
Sticking. The Hand buttons in the Add tool’s row mark which hand plays a hit: L (left), R (right), B (both) or clear. With nothing selected, pick a hand and click hits to mark them. With hits selected, the hand is applied to all of them at once.
Labels. Right-click a cell and choose Add Label… to put a short text note on the grid, up to 50 characters. Use labels to mark sections like Verse or Chorus, or a reminder like open on 4. Right-click a label to edit or delete it.
Step 6: Record from your kit
If you can play it, recording is often faster than clicking. Click the red Record button in the bottom right and play along. Your hits are written into the pattern with the velocity you play them at.
Rec quantize, above the transport buttons, snaps recorded hits to the nearest note value, such as 16th. Set it to the shortest note you play. Afterwards, tidy up any wrong hits by hand in Select mode. A whole recording take is one undo step.
Step 7: Line the grid up with the audio
If the pattern has audio, the wave under the grid shows the recording. Use the Audio selector above the grid to choose what you see, and turn on Colorize to tell kicks, snares and cymbals apart by colour.
Drag mode on the left of the wave sets what happens when you drag the waveform:
- Offset slides the audio earlier or later against the grid. Use it to line up the first hit. The current offset is shown below, and Reset offset puts it back to zero.
- BPM stretches the tempo so the beats line up with the bar lines. Beat 1 stays where it is, so line up the first hit with Offset first, then grab a later beat and drag it into place.
Right-drag does the other mode. In Offset mode, right-dragging the wave stretches the tempo. In BPM mode, it slides the audio. That way you can line up the first hit and fix the tempo without switching modes.
On a pattern with a tempo map, the map sets the tempo, so the BPM stretch isn’t available: the BPM button is greyed out and right-drag does nothing. Use tempo anchors instead.
Tempo anchors
When a song speeds up or slows down, one BPM can’t fit the whole recording. A tempo map lets the grid follow the band, and you shape it with tempo anchors right on the wave. Each anchor shows up as a vertical line with the tempo next to it, such as 94.4.
- Add an anchor. Hover over the wave where you want it and click the Add button that appears under the cursor. Adding an anchor doesn’t change anything you hear. It only pins that spot so you can adjust it. On a pattern without a tempo map, the first anchor creates one from the current tempo.
- Move an anchor. Drag its line onto the beat where that moment in the audio should land. Only the stretch between the anchors on either side changes, and the rest of the song stays put. The line snaps to bar lines as you drag. To place it freely, see Keyboard shortcuts.
- Remove an anchor. Hover over its line and click Remove. The two sections either side of it merge into one steady tempo, and the anchors next to it stay where they are. The first anchor, at the start of the pattern, can’t be removed.
Pin before you pull. Before fixing a section that drifts, add an anchor at each end of it. Then when you drag an anchor in between, only that section changes, not the next twelve bars.
To get rid of the tempo map completely, click the tempo range button next to Tap in the Timing panel and choose Remove map. The pattern goes back to one steady tempo, the median of the map, and the hits stay on the same moments in the audio.
Step 8: Listen and save
Click Play and listen to the pattern. The mixer on the right lets you balance it:
- My drums sets the level of your own kit.
- Pattern sets the click and the pattern’s drums.
- Audio sets the song’s backing track and its drum stem. Turning the drum stem up next to the pattern drums is the quickest way to hear hits that don’t match the record.
Turn on Rewind on loop end if the audio should jump back to the start of the loop each time the pattern loops.
When it sounds right, click Save pattern. Use Add info to give the pattern a title and description. It’s worth it if you share the pattern in a pack, so others know what they’re practising.
Keyboard shortcuts
On Mac, ⌘ is Command, ⌥ is Option and ⇧ is Shift.
Select mode
Most shortcuts live here, because Select is the mode where you work with selections.
| Action | Mac | Windows |
|---|---|---|
| Add a hit | ⌥ + click | Alt + click |
| Remove a hit | ⇧⌥ + click | Shift + Alt + click |
| Add or remove a hit from the selection | ⌘ + click | Ctrl + click |
| Select a range from the last clicked hit | ⇧ + click | Shift + click |
| Select all | ⌘A | Ctrl + A |
| Select everything after the selection | Tab | Tab |
| Select everything before the selection | ⇧ Tab | Shift + Tab |
| Copy | ⌘C | Ctrl + C |
| Cut | ⌘X | Ctrl + X |
| Paste | ⌘V | Ctrl + V |
| Duplicate | ⌘D | Ctrl + D |
| Delete | ⌫ | Delete or Backspace |
| Move one grid step earlier or later | ← / → | ← / → |
| Move to the drum lane above or below | ↑ / ↓ | ↑ / ↓ |
| Set the hand on selected hits: left, right, both, clear | L / R / B / U | L / R / B / U |
| Leave Stretch without changes | Esc | Esc |
Add mode
| Action | Mac | Windows |
|---|---|---|
| Pick the Hand tool: left, right, both, clear | L / R / B / U | L / R / B / U |
With a hand picked, clicking a hit marks it with that hand instead of cycling its velocity.
Remove and Extract modes
Neither mode has shortcuts of its own. Use the shortcuts that work in every mode below.
Every mode
| Action | Mac | Windows |
|---|---|---|
| Undo | ⌘Z | Ctrl + Z |
| Redo | ⇧⌘Z | Ctrl + Shift + Z or Ctrl + Y |
| Zoom in or out | ⌘ + scroll | Ctrl + scroll |
| Drag a tempo anchor without snapping to bar lines | ⇧ + drag | Shift + drag |
Tips
- Trust your ears over the grid. If a hit looks right but sounds wrong, it’s wrong.
- Work in sections. Get the main groove right first, Duplicate it through the song, then go back and edit the fills and variations.
- Use the right lane. The editor has lanes for China, two crashes, ride, hi-hat, open hi-hat, kick, snare and three toms. A hit on the wrong lane will count as a miss when you train, even if it sounds similar.
- Save often. A big copy-and-paste is easy to undo, but a closed window isn’t.